
- Supplying Artwork / Print Ready Files
- Images
- Digital Printing
- Checking Proofs
- Design Consideration
- Folding
- Stock
- Personalisation
- Environmental Paper Terminology
Supplying Artwork / Print Ready FilesÂ
We accept files in the formats below:
- Indesign
- Illustrator
- High Resolution PDF’s
Please ensure that artwork includes:
- Minimum of 3mm bleed.
- High Resolution images.
- Package your Indesign files and include all links and fonts.
- Double check that if the file is to print as CMYK that all other PMS if present be removed.
- If PDF files are supplied, is the document set up as singles pages and not spreads?
- Is the file saved according to Coated or Uncoated stocks?
- Should the job require a Die-line or Spot UV please indicate as a dedicated spot colour within the palette. This will need to be set to overprint. Alternatively should you prefer the method of supplying a separate layer with a dedicated spot colour that too achieves the same outcome.
- If the job is to have perforation, please include a broken line indicating the position of where it falls within the artwork using a spot colour.
Images
- Ensure all images supplied within your file is 300DPI
- Before finalising your files please ensure all images are converted to CMYK. The only exception is if you are using the printing process Hexachrome. In this instance all files are to remain RGB.
Digital Printing
- When supplying artwork for digital print, please note we print directly from your high resolution PDF file.
- If supplying PDF files please ensure they are high resolution with trim marks along with 3mm bleed.
- No final PDF is provided for sign off as per the process with offset printing. Unless changes have been made at the last minute.
- Artwork that requires Personlisation we request an accurate spreadsheet be sent with the corresponding fields clearly outlined. In this case we will send you a final PDF to approve the names and font. Please note we export directly from the information provided by you.
- Ensure that images supplied in your file are high resolution as they will appear pixilated and at times and grainy depending on the image and paper stock.
- The heaviest stock we feed through our machine is 350gsm.
- Maximum sheet size is 330 x 487.
- Maximum image size is 315 x 472.
Checking Proofs
- DO A FINAL PROOF READ.
- Check your copy thoroughly for errors. Check telephone numbers, addresses, email and website addresses.
- Is the proof the correct size? Measure all dimensions.
- Are all the design elements present and in the correct positions?
- Ensure spacing is accurate amongst all the elements. For example: Text next to images, spacing between images, paragraphs etc
- If the job has multiple pages ensure that the pagination flows as it should. Check page numbers/folios are in the correct sequence and in the correct physical position.
- Does the job fold correctly? Multiple page work should ideally have a folded form proof for checking. Advise your printer should you require a mock-up if you have not prepared one.
- Are you satisfied with the quality and colour of any scanned images?
- When marking up alterations to proofs, make your corrections with something that will stand out and is permanent. Make your corrections legible and easy to understand.
- Should you require changes advise your account manager that you would be supplying new files for the corrected pages or that you would prefer our experienced pre-press team to do the amendments for you.
- Liaise with your Account Manager on the best options to have final changes signed off.
- Should there be several changes on the proofs such as copy changes, we recommend that you mark on the proofs and follow up with an email outlining in page order the changes made. This method allows prepress to have a checklist and ensure all changes have been made.
- For the client, you will receive final PDF’s for sign off and can use this checklist as a reference for the final PDF’s ready for approval.
- Also note: The colour that your client sees on their screen compared to yours as a Graphic Designer or ours internally at prepress will vary. All screens have varying calibrations. Ensure that your client is made aware of this. This can manage their expectations and keeps them informed as they move through the process of sign off.
- If colour corrections are made to the artwork once contract proofs have already been sighted another set of updated contract proofs will be outputted to ensure our craftsmen on the press are working toward your true expectation.
- Contract Proofs are calibrated to the presses of each printing company. Do not expect that you will get the same colour output on proofs from every printer.
Design Consideration
There are several elements to take into consideration when you are at concept stage of the project.
Stock:
Ensuring your stock selections suits your design and meets with the expectation of the client is imperative. Ideally beginning the stock selection at concept stage is advisable as it can determine the types of coatings, embellishments and or finishing processes that you have to work with.
For example:
- The use of coated to uncoated stock will make the same design printed offset achieve a very different result.
- Using metallic inks on uncoated stock will give you a varied result.
- Applying a Spot UV process on an uncoated stock is not advised. In this instance to achieve a similar result you would need to consider a clear foil instead.
If you wanted to include a Spot UV in the design to enhance a logo or feature, consideration needs to be given to the overall look and feel of the project. If this is offset by a darker background, creating the Spot UV effect as a blind application rather than over a printed area could optically give you a more enhanced look.
Keep in mind that Paper Merchants in Australia offer a supportive range of services within their sample departments. Stay up to date with paper ranges across all merchants. Ideally obtaining paper samples at the early stage of the concept process could make a huge difference to the outcome of the project. It also allows you to have both mock-ups and printed samples ready for your client pitch. You then have a visual aid for you to further sell your concept and educate them in the process.
Embellishments
The process of enhancing a printed product and adding greater perceived value.
Does the cost incurred for either foiling or embossing fit within your budget?
How effective would embossing/debossing be? Should you apply a blind emboss to the piece for great optical intensity?
Colour
Consideration for whether the job is to be produced in PMS colours or CMYK is important. It may impact your budget depending on the nature of your job.
Do you need to have CMYK + PMS or can you achieve a simulation of the PMS through CMYK?
Binding
Burst Bound
When looking to have a publication burst bound, the general rule of thumb, to ensure a minimum spine of 3mm is allowed for. This is due to the nature of the machinery that is used to bind.
If you are unsure, consult your account manager for advise or contact your preferred paper supplier to arrange a mock-up. This is one of the easiest methods to gauge the approximate spine width.
You will also need to consider allowing for the glue trap in the spine on the inside of the cover.
Our Prepress and Production professionals can assist with this.
Saddle-Stitching
This is a common method of binding a publication. The number of pages and the grammage of the text pages need to be taken into consideration. Particularly when the page count starts exceeding 48pp. Elements such as creep will need to be looked at. Creep occurs when the inner text pages ‘s creep or extend out from the outer sections when the publication is folded. It is recommended that an allowance for creep be considered to avoid uneven margins by attempting to trim pages to achieve a neat result.
Ideally once the pages are designed, you would need to alter the inner and outer margins to achieve a quality product that is neat in appearance and with your text pages intact.
The grammage of stock can alter the look of the publication. If the grammage is too heavy with excessive amount of pages you may end up with a publication that does not sit flat and opens.
Images
If you are considering doing a full page spread keep in mind technically the ideal result is a perfect line up.
Saddle-stitch booklets are far easier to work with however it is achievable with Burst Bound or PUR Binding. If you are unsure, speak with your Account Manager who can advise you.
Ensure all images are converted to CMYK and are high resolution quality. Recommended to be 300DPI.
Speak to one of our experienced Account Managers to guide you in the right direction.
Coatings
When you are at concept stage of your design, the type of coating you may wish to consider should be part of this process.
There are several options available and they all can play a different role in the finish of your printed piece.
Aqueous Coating is the preferred method of coating at Manark Printing. Environmentally sound compared to that of other varnishes and UV coatings, this water-based coating absorbs into the sheet. It is applied from the last unit on the press. It protects the sheet from elements such as scuffing, aids with quicker drying times and improved durability of the sheet.
Used in application on all types of paper stocks.
Available in Gloss, Satin and Matt finishes.
Running a spot coating is to be considered when you are working on projects such as mailing pieces. If personalisation needs to be applied, consider doing a spot varnish to ensure that the area being personalised does not have a coating on it for ease in doing this application.
Sealer Varnishes are used as its name suggests to seal the ink, protecting the sheet from scuffing. Varnishes are applied on the press from its own printing press unit as a ink without pigment. Ultimately sitting on top of the sheet as a protective layer.
Varnishes are available in Gloss, Matt or Satin finish.
This method can omit a slight odour once the job is printed and boxed. It can also create a slight yellowing of the printed piece over time.
Some printers prefer not to use sealer on Gloss coated sheets however ensure varnish is applied on matt, dull or satin coated grades and uncoated stocks.
This application can be used as a wet trap meaning it is applied in line with the other inks. It can also be applied as a dry trap, which is achieved by printing the ink components, letting the sheet dry and placed through another pass on the press applying the varnish.
This process is particularly effective if you run for example a spot matt sealer varnish wet trap and then run a selection of images as a dry trap gloss varnish. The use of the right type of stock makes for a more effective result without the cost of doing a Spot UV. By no means is it the same in appearance however serves as a cost effective way to create subtle differences.
Lamination is a process that is applied after the printing process in either Gloss or Matt. Also known as cellosheen this application enhances a printed piece. When design considerations are applied this process can take the printed piece to the next level in perceived quality.
This process is particularly useful should you find that for example the cover of your brochure, booklet or magazine has a high density and coverage of ink. Applying a lamination is a method that will avoid any issue in cracking on the spine and will protect the sheet with solid colour. Know though that this application can change the colour of images slightly so consider this. Consider heightening colours to compensate for the slight change that may occur.
UV Coating is generally applied to enhance the printed piece. Applied after the process over the entire printed page or as a spot, the coating is cured using ultra-voilet light and dries by exposure to UV radiation.
This process can create dynamic accents to printed pieces and should come up for consideration during the concept stage if possible.
This process does aid drying time.
There is another type of UV Coating on the Australian market which when applied is far more thicker and raised than the normal coating. Termed High-Bulk UV it comes with a few restrictions however, for example not applying so it bleeds off the page or along with spine as it may crack. Cost of this is slightly more expensive than normal UV Coating.
Please note that this also works exceptionally well on digitally printed pieces.
Need advise, technical guidance, direction on concept to enhance you design, speak to your Account Manager or give us a call on 03) 9794 8337.
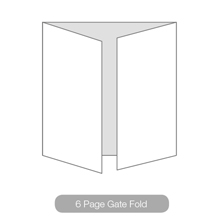
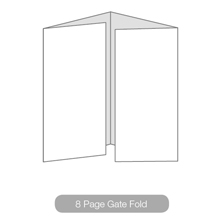
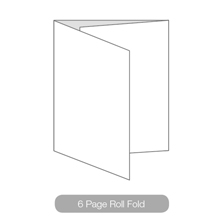
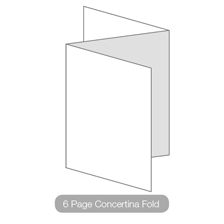
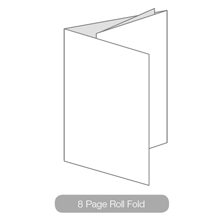
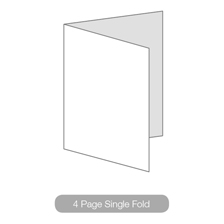
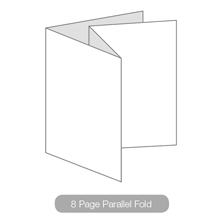
Folding
Generally speaking there are several types of folding techniques and options to apply to your projects.
Rule of thumb is that folding needs to be with the grain of the paper, otherwise the sheet could be susceptible to cracking (as it’s going against the grain).
If the project has several panels ie DL Roll fold, keep in mind the individual panel sizes may need to vary by 1-2mm to ensure the finished product lies flat. The grammage used on the job is also a factor. Should the grammage be say 350gsm, and you are applying consideration for each panel in width, remember the score line itself is about 1mm so you loose that in the measurement.

Stock
With the many options on the Australian market, this component of any design process should be included in the concept process.
The stock you choose will depend on many factors:
- What is the end use of this project?
- Does the stock need to have environmental accreditations?
- What is the life span of the printed piece?
- Is the project for a stationery suite? Are envelopes required? If so, how many and what size?
- The grammage of the stock for multiple page projects: ie either Cover and Text or Self-Cover
- The grammage of the stock for a complicated folding design.
- Is the project for mass mail distribution? Lighter grammages may have impact on mailing costs.
- Will the project be more suitable to Coated, Uncoated or Specialty stock options?
- What print processes are you going to use?
- Is the paper sufficiently opaque to minimize show through if both sides are to be printed?
- The budget of the overall project.
- The run size of the job at times will depict the type of stock.
With very large run projects, speak to your Account Manager in the initial stages to ascertain the stock levels at a Paper Merchant. This could reduce stress levels down the track. Particularly, once your client has approved your stock recommendation, Purchase Orders comes through and stock levels can not fulfill their requirement.
This is a perfect time to discuss the project specifications. Have the printer identify approximate number of sheets required to produce the job.
Printers can use this information and assist in the elimination process to which stock would be suitable. The time frame of the job might dictate that stock off the floor is required to be quoted on. In some instances if a job has a longer time frame for production, consider options for indenting the stock.
- Stock at times can equate to 1/3 third of the total cost of the job. Planning ahead and doing the right research, understanding the impact the stock has on a job is just as important as getting the design spot on for your client.
- The decisions you make can either make or break your job.
Speak to one of our Account Managers for guidance and how to achieve the best outcome for your projects.
Call us on 03) 9794 8337.
Personalisation
- Please ensure all information provided is accurate.
- If your job requires names to be merged into a document, we ask that you supply us with a spreadsheet with all fields corresponding to that of the artwork.
- We will forward a final PDF for approval to ensure all required fields are as they should be.
- Should there be any changes please notify us via email and where possible resupply an updated spreadsheet to eliminate any error or confusion.
- Once you have approved the PDF we have prepared we will print according to this.
- We are partnered with experienced mailing houses. This allows you, our clients to be able to have your entire project managed at Manark Printing.
- Should you require multiple positions, personalised codes and addressing to be included in the one document, we are able to have this produced and mailed out on your Australia Post Account.
All In House at Manark Printing.
Environmental Paper Terminology
Recycled
![]() Is paper that is manufactured from either 100% Post Consumer or a mix of Pre and Post Consumer Waste. Pre Consumer waste is described as wastage from the mill in the process of papermaking. Post Consumer is described as elements such as milk cartons and newspapers. This is then deinked and introduced back into the paper making process. The percentage of Pre and Post Consumer waste may differ.
Is paper that is manufactured from either 100% Post Consumer or a mix of Pre and Post Consumer Waste. Pre Consumer waste is described as wastage from the mill in the process of papermaking. Post Consumer is described as elements such as milk cartons and newspapers. This is then deinked and introduced back into the paper making process. The percentage of Pre and Post Consumer waste may differ.
Australian Made
![]() This symbol identifies stocks that have been produced in Australia.
This symbol identifies stocks that have been produced in Australia.
ISO 14001
![]() Environmental Management Systems is defined as an international standard for the development of effective environmental management systems (EMS). The process allows for control and consistency in a company’s improvement of their environmental processes and performance.
Environmental Management Systems is defined as an international standard for the development of effective environmental management systems (EMS). The process allows for control and consistency in a company’s improvement of their environmental processes and performance.
EMAS/EMS
![]() Emas Eco Management and Auditing Scheme. Established by a European Commission this scheme is directed at the improvement of a companies’ environmental performance.
Emas Eco Management and Auditing Scheme. Established by a European Commission this scheme is directed at the improvement of a companies’ environmental performance.
TCF
![]() Totally Chlorine Free is a process used in bleaching paper pulp that is environmentally friendly. No chlorine gases are used in this process.
Totally Chlorine Free is a process used in bleaching paper pulp that is environmentally friendly. No chlorine gases are used in this process.
ECF
![]() Elemental Chlorine Free is a term used when virgin paper is bleached. This process is where pulp is bleached without elemental chlorine but with a chlorine derivative
Elemental Chlorine Free is a term used when virgin paper is bleached. This process is where pulp is bleached without elemental chlorine but with a chlorine derivative
PCF
![]() Processed Chlorine Free is the process where paper is made using no chlorine compounds and needs to include a minimum of 30% post consumer content.
Processed Chlorine Free is the process where paper is made using no chlorine compounds and needs to include a minimum of 30% post consumer content.